When Did Art Change Retesting Retesting and Regression Testing
How to automate a visual regression test
1 of the biggest nuisances when releasing a product or feature are regressions in your codebase. Some functionality that was working just fine two weeks ago is now broken – and it's always the customer who discovers the problem. Without automated testing, yous're doomed to either:
- Spend too much time manually testing functionality for every change
- Run a greater risk of unknowingly breaking existing functionality
Despite this knowledge, many of us don't bother writing automated regression tests, equally nosotros feel it's just also much work to set up and maintain. Luckily that's changed. We can now write fairly comprehensive tests using a technique chosen visual regression testing.
Regressions occur when functionality stops working equally expected. Usually this happens after a code modify, but it can also occur due to changes in page content or time-based conditions (east.g. daylight savings messing up alarm clocks).
We examination by comparison the look of a website before and after changes (i.e. diffing). This is not examination-driven development, where you write your tests and then your code – instead, you' re testing against the visual output itself.
Getting started
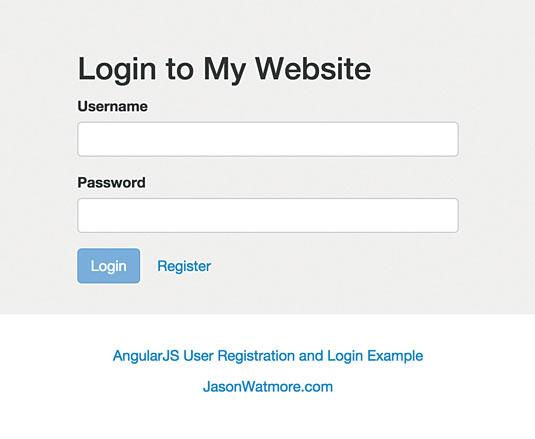
To go on things simple, I'm testing a bones login screen. I forked a neat little Plunkr written by Jason Watmore. I'll be testing on a local copy, but I could easily examination using the original Plunkr itself.
There are a plethora of testing tools available and each have strengths and weaknesses. For example, Wraith and BackstopJS are great for quickly testing a large swathe of pages. You lot simply add the URLs of the pages you desire to bank check along with CSS selectors to focus on and run it.
This works extremely well for static sites, just won't capture the complexity of modern spider web apps. In those cases, you'll need to dive into exam scripting. This means writing a gear up of deportment to have – essentially, pedagogy the reckoner to browse your website. CasperJS is great for this, just doesn't allow yous to exam across the entire browser suite.
In lodge to capture the full scope of testing we're aiming for, we're going to rely on a tool the manufacture has been using for years: Selenium.
Installing Selenium
In the past, using Selenium has meant installing a Java runtime and writing a bunch of Java code for the test cases. Thankfully for frontend developers, that's inverse.
Setting up Selenium locally is now uncomplicated for anyone familiar with npm. Cheers to the selenium-standalone module, all I need to practise is run three commands in my command line.
npm install -g selenium-standalone selenium-standalone install selenium-standalone start This gives me programmatic access to the browsers installed on my computer, assuasive me to use WebdriverIO, an npm module that provides Selenium bindings for Node.js. I'll be using a related tool called WebdriverCSS. WebdriverCSS is essentially an add-on to WebdriverIO, adding on visual regression testing.
To install both, I run npm install webdriverio webdrivercss from the control line of my project root folder.
Writing my examination
Now I have everything installed and Selenium running, it's time to write my first exam. To proceed things organised, I created a 'tests' folder, and within information technology a subfolder named 'visual'. This folder will firm both our tests and our screenshots. I and so created an empty JavaScript file named 'login.js' .
The first thing I need to practise is load WebdriverIO and WebdriverCSS. This is a Node.js script, and so I' ll exist using its built-in require statements:
var webdriverio = require('webdriverio'); var webdrivercss = crave('webdrivercss'); Next I initialise WebdriverIO, and ascertain which browser to exam in:
var client = webdriverio.remote({ desiredCapabilities: { browserName: 'firefox' } }); By passing in 'firefox' as the value for the browserName property, I tell WebdriverIO to apply my local re-create of Firefox. The desiredCapabilities object can contain a lot more than information, peculiarly when testing on a more advanced Selenium set-upward. However, for my needs, this is all that' south required.
There'southward one more particular I accept to take care of before starting on my bodily exam example. I need to initialise WebdriverCSS and define a couple of paths for storing images.
webdrivercss.init(customer, { screenshotRoot: 'tests/visual/baseline', failedComparisonsRoot: 'tests/visual/failures', }); Yous tin can change the paths to match your setup, or rename baseline and failures to something different if you prefer. The main bespeak is to keep it all inside the ' tests/visual/' folder.
Basic website connexion
Now that everything is gear up, information technology's time to write the actual tests. To practice this, I first specify the website I'chiliad testing:
client .init() .url('http://localhost:3000') .end(); There'due south also some initialisation and cleanup code surrounding the URL definition, which indicates to WebdriverIO when it should start and stop the test.
Ascertain screenshot areas
Now comes the actual test. I'm going to capture two areas of the login course: the page header and the form itself. To define this, I phone call the webdrivercss function and laissez passer in my details.
client .init() .url('http://localhost:3000') .webdrivercss('login form', [{ name: 'championship', elem: '.container h2' }, { proper noun: 'class', elem: '.container class' }]) .stop(); login course, title and form are all human being-friendly names used to generate the image filename of the screenshot. The other role is the elem property. This is what Selenium will use to find the element you're looking for.
While information technology'south mutual to utilise a CSS selector for this, you also have the full suite of selector strategies bachelor via WebdriverIO.
Comparing changes
At present nosotros have the exam script written, it's fourth dimension to try it out. I open the control line back up and execute node tests/visual/login.js from my project root. I wait a infinitesimal or two for it to complete the execution. During this fourth dimension, a Firefox window pops upwardly with the website being tested, and I can sentry as the tests run.
After the tests have completed, I'm returned to my command prompt. Initially, it looks like nothing happened, but when I open my 'tests/visual/baseline' binder, I now accept three new images in it: 'login form.form.baseline.png', 'login class.championship.baseline.png' and 'login form.png'. Our main focus is the '.baseline' images. The tertiary epitome is more of a reference of the overall folio being tested (in case I need it for debugging).
Note: If yous're running your tests on a Retina display, your screenshots will likely be off. This is a known issue with WebdriverCSS. The best workaround is to use an external Selenium Filigree provider like BrowserStack or Sauce Labs to run your tests.
Catching regressions
The baseline images don't tell me much, autonomously from the fact that they've captured the correct area of the page. To see regressions, I have to innovate a change and run the tests over again.
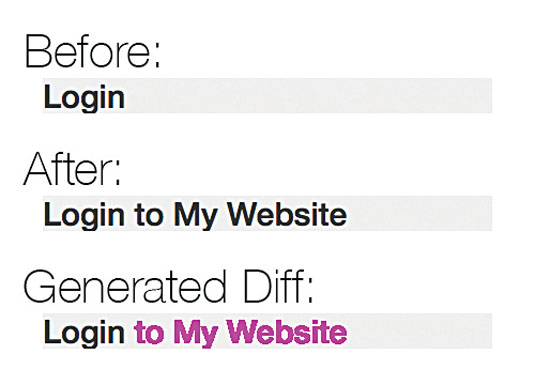
I'm going to alter the title of my page to 'Login to My Website' and run the tests a second time. Now that I have baseline images available, WebdriverCSS is smart enough to know to compare the latest images to the baseline.
In one case my test is complete, ii new images are now available. The first, inside the 'baseline' folder, is named 'login form.championship.regression.png' and shows the newly captured screenshot. The '.form' prototype remains the same, as no changes occurred between the ii test runs.
The second image ('login course.title.diff.png' ) is in the 'failures' folder and is the diff output. This prototype is generated past ImageMagick and highlights the differences between the '.baseline' and '.regression' shots. This helps us quickly grasp what parts of the image take actually changed.
Accepting change

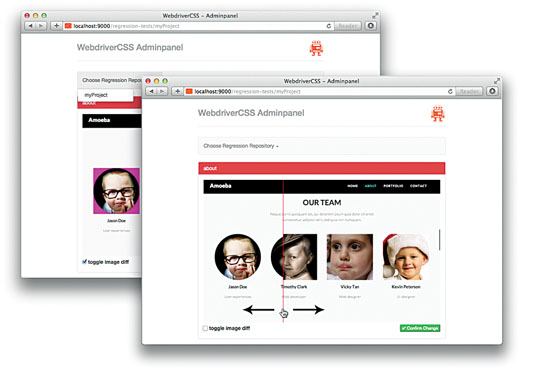
If you've made changes on purpose, you lot'll want to update your baseline. To practise this, replace the old '.baseline' image with the new '.regression' one by deleting and renaming the files. To help with this process, the WebdriverIO folks created an Admin Console interface that really improves the workflow. Cheque it out.
Final thoughts
While visual regression testing is withal a new discipline for frontend, usage is steadily growing. Information technology works with the visual nature of the spider web to offer a relatively like shooting fish in a barrel style to gather useful functional regression results. Invest the time to try it out and you'll accept more confidence next time you update your codebase.
Words: Kevin Lamping
Kevin Lamping is a senior frontend engineer at InVision. This commodity was originally published in issue 272 of net magazine.
Liked this? Read these!
- 4 tips for a smarter CSS workflow
- Useful and inspiring flyer templates
- Download gratuitous textures: high resolution and set to apply at present
Related articles
Source: https://www.creativebloq.com/web-design/automate-visual-regression-testing-111517944
0 Response to "When Did Art Change Retesting Retesting and Regression Testing"
ارسال یک نظر