How to Make a Cardboard Sniper Rifle That Shoots Easy
Introduction: Fully-Functioning Cardboard AS-50 Sniper Rifle
Intro
In this tutorial I'll be showing you how to create a fully-functioning, 1:1 scale model of an AS-50 sniper rifle using only cardboard and other common household materials.
Features
When complete, this gun features:
- A working scope.
- A collapsible, locking bipod stand.
- A fully-operational shooting system capable of firing pen springs.
- A functional trigger, magazine, and reload bolt.
Below is a video showing more details:
History of this Project
I have been working on designing and building this gun for close to four years, so I hope you appreciate the tremendous amount of effort that went into it. (The journey began when I was in eighth grade, sketching diagrams of a firing system in the margins of notebooks at school. Since then, that firing system has been through multiple iterations before I finally settled on one that works. As of writing this, I'm a junior in high school.)
Navigating the Tutorial
Due to the large number of steps that go into building a model like this, I will only go into detail on steps that feature a unique build process, or are particularly complicated. A large portion of the model consists of creating various shapes out of cardboard and gluing them together, so I will tend to skip over those steps and only include a picture or two as to what it should look like. I find that this makes it easier for you to hone in on what's important.
One Last Note...
This tutorial will be showing how to create a specific type of gun, the AS-50 sniper rifle. I would like to point out, however, that the techniques I will cover can be applied to creating any type of gun out of cardboard, with a bit of creativity.
...and a Disclaimer
I would like to apologize in advance for the poor quality of images appearing in the first half of this tutorial. As I already mentioned, this project has been in the works for close to four years, so at the time I started I only had access to a cheap camera. About halfway through I bought a better camera, so the image quality significantly improves.
And lastly, being that I am showing you how to build a model gun, I feel obligated to throw in a safety warning: Even though this model only shoots pen springs, do not fire it at people or animals.
Now on to the next step, and let's begin!
Step 1: What You Will Need
The following list contains everything you will definitely need to build this model. Whatever you don't have I would recommend buying. In addition to these, there are also some other miscellaneous materials that will come up along the way, but these you can improvise if you don't have them.
What You'll Definitely Need:
- Hot glue gun (preferably a good quality one)
- X-Acto knife
- Good quality pair of scissors
- Pencil
- Ruler
- Triangle tool w/ a right angle
- Needle-nose pliers
- A thicker pair of pliers
- A big pile of cardboard
- A bunch of old pens
- Some paperclips
- Some neodymium magnets (about the size of a pea)
Step 2: Calculate a Scale Factor
In order to make this gun actual-sized, we are going to be basing it off a picture. Here's the one I used:
http://img01.deviantart.net/0a20/i/2010/067/b/c/as...
First, print out the picture. Then, measure the length of the entire gun in the picture. In my example, the length was 6.15". Now, run a Google search or two to find the actual length of the gun. The actual length of the AS-50 is 53.9", so in order to calculate the scale factor, follow these steps...
- Scale factor = Actual length / length in picture
- Scale factor = 53.9" / 6.15"
- Scale factor = 8.76422
The scale factor is 8.76422. What this means is that you can use this number with the picture to find the actual length of any component of the gun. To do so, measure that component in the picture, then multiply by the scale factor. That will equal the actual length of that component.
So for example, if you wanted to find the length of the barrel, first measure it in the picture. In my example, it is 2.5". Multiply 2.5" x 8.76422 = 21.9". The actual length of the barrel is 21.9".
Step 3: Create the Handle - Part 1: Cutting the Cardboard
The handle is usually a good place to start, so let's build it! For this step I'll go into detail on the method I use to cut and glue cardboard, but for future steps I'll simplify it down more because that same method is used each time.
1. Draw Lines
First we're going to trace out the feature on a piece of cardboard. This can sometimes take a decent amount of time, so don't rush it. Use a ruler to make every line perfectly straight, and use the triangle to make perfect 90° angles. Also, remember to use your scale factor every chance you get. Learn to love it.

2. Cut it Out
Cutting out the part seems easy, and it is, but I recommend you be a perfectionist when doing it. We want every edge and every corner to be precise enough so that everything fits together later on. When cutting, DO NOT USE SCISSORS. This is very important, hence why it is in caps. Instead, use an X-Acto knife. The X-Acto knife is not only easier to cut with, but it gives you much cleaner, more accurate cuts.

3. Check over
Once the part is cut out, give it a quick look-over to make sure everything feels right. So for the handle, hold it in your hand and pretend you're holding a gun. If it doesn't feel right, then go back and check your measurements and recut as needed.

Step 4: Create the Handle - Part 2: Gluing
With the handle cut, we're going to move on to gluing it. Use a hot glue gun for this, and make sure it is on the "high" setting (if your glue gun only has one setting, ignore this).
4. Glue on filler pieces
For the handle to be sturdy, we are going to glue in "filler pieces" of cardboard. These allow you to have a tight grip without worrying about destroying it.


5. Glue on a border
Last step is to glue a border around the handle. Cut out a long strip of cardboard the same width as the handle. Also, pay attention to the "grain" of the cardboard. To allow the border to bend and take the shape of the handle, cut it out so the grooves run perpendicular to the long side of the strip.


Step 5: Make a Trigger
With the handle complete, let's move on and make a trigger. The trigger is spring loaded and will eventually be connected to the firing system, so be patient and don't rush it.
- Start off by gluing the handle onto a piece of cardboard that will serve as the bottom of the gun. The piece I cut was 6.84" x 2", but feel free to vary that size. When cutting pieces, I try to visualize what the picture of the gun would look life if it were broken down into individual components. The more components you use the more detailed the gun will be, but the more complicated it will be to build.
- Cut two identical pieces of cardboard shaped like a trigger. (see the pictures)
- Bend a paperclip to match that shape, and glue the paperclip between the two cardboard triggers. This should form a sort of "paperclip sandwich" with the cardboard as the bread.
- Cut a slit into the gun where you want the trigger to be, and position the trigger in place.
- Feed a thick piece of metal wire through the cardboard of the gun (running through the ridges) and pierce it through the center of the trigger. This piece of metal wire serves as a hinge on which the trigger can rotate. See the pictures above to see what I'm talking about.
- Right behind the trigger, glue a stack of cardboard to serve as a stop for the trigger. Make sure that when the trigger is up against the cardboard it is in a good "neutral position." If not, then move the cardboard stack closer of farther until it looks good.
- Glue a small piece of paperclip wire into the cardboard stack that will serve as a hook for a pen spring.
- Take a pen spring (found by taking apart a clicky pen) and connect it between the paperclip hook and the paperclip coming out from the top of the trigger.
Once the trigger is finished, play around with it for a bit to make sure it feels right. If it feels too lose or tight, adjust the position of the hook, or use a different sized spring.
Step 6: Start Building the Gun's Body
In this step we're going to start gluing some cardboard onto the gun to begin to give it some shape, as well as continue to build the trigger.
First, check out the four images above to see what cardboard pieces I glued on. From here on out, I will not go into detail on the dimensions and whatnot of cardboard pieces, so use your picture and scale factor to find them yourself.
After you've given the gun some shape, bend the wire attached to the trigger forward and connect another piece of wire to it. To get a piece of wire like this simply unbend and shape a paperclip.

With that done, glue a piece of cardboard to the front, making sure to leave a slit for the wire to move up and down. What this accomplishes is it converts the pulling of the trigger to the up and down movement of the paperclip wire.

Step 7: Cut and Glue a Framework Piece
When making a cardboard gun, it is helpful to attach a large piece of cardboard that will serve as a framework on which you can build smaller elements. For this gun, the framework I am using is in the first picture above.
- First, cut out two identical framework pieces.
- Find a wooden dowel you will use as a reload bolt. Exact size doesn't matter, but it should roughly be a little bit thicker than a pencil.
- In order to make a slider for the reload bolt, cut a rounder rectangle shape into the side of the cardboard. Use the reload bolt to trace two circles and then connect them using the ruler.
- Use an X-Acto knife to carefully cut out this shape.
- Repeat for both framework pieces.
- For now, we are only going to be attaching ONE PIECE of framework cardboard to the gun. Tuck the other aside, as we will come back for it. Use hot glue to attach the framework to the body of the gun.
Step 8: Build a Housing for the Trigger Wire
Now we are going to build a housing unit for the wire connected to the trigger. What this will do is allow us to push against the wire without damaging it. You'll see why this is important later...
- First glue a piece of cardboard with a hole in it that the wire will fit through (see first picture).
- On top of this piece, begin gluing cardboard to give it some thickness and to allow us to glue another piece on top. Also glue a wire (a thick one, cut from a coat hangar) up against the trigger wire. (see second and third pictures)
- Now glue a "roof" on the housing unit and attach another metal bar to be touching up against it. NOTE: The last metal bar prevented the wire from moving back; this one prevents it from moving forward. Once these are all in place, the trigger wire can ONLY move up and down. This is a good thing. Also glue a piece of cardboard in front of the housing unit. (see fourth and fifth pictures)
- Lastly, we are going to glue a piece of cardboard strengthened with a piece of wood in front of the housing unit on top of the piece of cardboard just placed. Cut a small slit in the top. You'll see why in a bit. (see sixth and seventh pictures)
Step 9: Create a Spring-Loaded Shooting Mechanism - Part One: the Tube
The power behind the gun shooting comes from a mechanism built from the body of a pen. In this step we'll be building the tube of that mechanism.
- Find a pen like the one pictured above. The pen I used was a common gel pen, but if you don't have one I'm sure you can improvise your way through with a bit of creativity.
- Remove the ink tube from the pen. Set it aside for use later.
- Remove the grip and the stopper from the pen tube. You can discard these if you so desire.
- Screw the tip back onto the pen.
After that the tube part of the shooting mechanism is complete. In the next step we'll be building the spring-loaded part.
Step 10: Create a Spring-Loaded Shooting Mechanism - Part Two: the Springy Part
Now we'll be building the part that is going to be able to shoot stuff:
- Take the ink tube you removed from the pen in the previous step.
- Use a pair of pliers to take off the little metal tip on the end. NOTE: Make sure the pen is out of ink or else this can get messy.
- Cut a piece of jewelry wire about a foot or so long.
- Tie a knot on one end of the jewelry wire.
- Step 2 should have left a small hole in the ink tube. Feed the jewelry wire through this tube all the way, so that the knot is left on the inside.
- Insert two pen springs onto the jewelry wire.
This completes the springy part. In the next step we'll attach the two together.
Step 11: Create a Spring-Loaded Shooting Mechanism - Part Three: Putting It All Together
Now we're going to finish the shooting mechanism and attach it to the gun itself.
- Connect the two by simply inserting the ink tube back into the thicker tube. Make sure the jewelry wire comes out the tip of the pen.
- Before you secure the two together, cut the outer tube short so that the ink tube extends outside of it. This will be the part of the gun that "punches" the ammo to fire it.
- Tie a knot right where the wire comes out. This knot is going to be taking a beating whenever the gun fires, so lob some glue onto it to add some strength.
- Glue a piece of cardboard in front of the wood piece, then glue the shooting mechanism on top of that. The jewelry wire should neatly line up with the slit we made in the wood.
Step 12: Connecting the Shooting Mechanism to the Trigger
I feel like I should give you a warning for this step: In theory, it is easy. In practice, it can be a real pain.
We are going to be tying a knot on the jewelry wire so that it locks onto the trigger wire when pulled back. The best way to do this is through experimentation and extreme patience. This is more of an art rather than a task of engineering. Keep working at the knot until it is in a shape that will allow it to slide up against the trigger wire and then lock into place when it is pulled back. The knot should be strong enough to hold the shooting mechanism in place against it. Once you have tied a knot you are satisfied with, you can attach a paperclip next to the trigger wire to "guide it into place" when the jewelry wire slides against it. Keep trying until you get it. This step is tough, but definitely not impossible.
Step 13: Create the Reload Bolt Door
Now that the last step is done, let's do something a bit more fun. The reload bolt door is pretty easy to make and is rather satisfying to play around with.
- Dig out that wooden dowel you used a while ago to cut out the reload bolt opening.
- Bend a thick piece of wire (from a clothes hangar) into the same shape as the reload bolt opening. Use the wooden dowel to help with getting the curves.
- Find the framework piece we cut out earlier. It is now safe to glue it onto the gun.
- Build the reload door out of cardboard (see the second picture above). It basically consists of a box with a semicircle cut in front to accommodate the wooden dowel.
- Glue a thin cardboard "rail" down inside the gun (this reduces friction).
- Assemble everything like shown in the fourth picture above. Remember to cut a slit in the cardboard.
- Lastly, tie the jewelry wire around the thick wire loop. Make sure it is tight so that when the reload bolt is pulled, the shooting mechanism is pulled back with it.
The wire loop and the cardboard slit may seem like unnecessary add-ons. What they do, though, is allow the reload bolt to be pulled back then slid back forward without un-priming the gun. This may seem confusing but once you build it it will make sense. This is important for two reasons. For one, it makes the reloading more realistic, but more importantly it reduces the resistance put on the shooting mechanism. Without the metal loop, the shooting mechanism will have to pull forward the entire bolt assembly, which draws away power that would otherwise be used for launching the projectile.
Step 14: Start Making the Shoulder Stock
In this step we'll be starting to build the shoulder stock. This step is pretty self-explanatory, so just take a look at the pictures above to see how I made it, and follow along as you see fit.
Step 15: Make the Magazine
The first part of this step is also pretty self-explanatory, so follow the pictures to build the basic frame of the magazine. Once that's done, we are going to put some accents on it to add aesthetic appeal. See the fifth and sixth pictures to see what I'm talking about. First, trace out the area to cut with a pencil, and then very carefully use an X-Acto knife to slice away the top layer of cardboard. You should be left with two impressive looking lines on either side of the magazine.
Step 16: Start Making the Magazine Slot
Start making the magazine slot by:
- Gluing two pieces of cardboard inside the walls of the framework piece of cardboard.
- Gluing a piece of cardboard above where the magazine will go to create a hole right above where the barrel will be.
See the pictures above for details.
Step 17: Optional: Improve the Shooting Mechanism
This step is optional because, depending on how well you made your shooting mechanism, it may or may not be necessary. At this point you've probably been playing around with the bolt and shooting mechanism for a bit, so you know whether or not it needs improvement. If so, try gluing a sloped piece of cardboard beside the metal loop like shown in the pictures above. This helps ease the jewelry wire onto the trigger wire so it is more likely to lock into place.
Step 18: Finish Making the Shoulder Stock
The shoulder stock is pretty difficult to make, so I have attached a number of different views above to give you an idea how I made mine. Feel free to add detail or take away detail depending on how comfortable you are with working with curves and rounded pieces of cardboard.
Once you have the shoulder stock made, glue it to the back of the gun, and glue a rounded piece of cardboard connecting the stock to the main body of the gun.
Step 19: Adding to the Front of the Gun
In this step we're going to add some more pieces to the front of the gun, before attaching the barrel itself.
- Cut a piece of cardboard tubing and glue a box on top of it (see first picture).
- Cut out a rectangular piece of cardboard to glue to the front of the gun, and trace the shape of the tube onto it. Stop the circle once it is level with the "floor" of the inside of the gun. (see second picture).
- Glue another floor inside the tube so that it will connect with the floor of the main gun once attached (see pictures three and four).
- Glue the tube onto the gun. Around the piece of cardboard that sticks out, cut a piece of cardboard that will fold around and cover it.
- On this piece of cardboard feel free to add accents much like were done on the magazine (see picture 5).
Step 20: Make the Bipod Mount - Part One: the Bipod Itself
The bipod mount is tough, but not as tricky as you might think. Let's do it:
- Create a trapezoidal piece looking like the one in the first picture above.
- Create two legs by gluing together long strips of cardboard.
- In order to make a hinge for the legs to fold open, glue a piece of cloth between the two (you can see this best in picture three).
- Insert the legs into the trapezoid piece and cut holes through everything to allow a plastic tube and straw to fit through. The straw serves to define the hole, and the plastic tube serves as the axle. (If you don't have plastic tubing, use something else of roughly the same size).
- Make sure the bipod can open, like shown in picture five.
Step 21: Make the Bipod Mount - Part Two: the Mount Itself
The mount part of the bipod consists of a box with a hole to rest the axle. Glue a thin piece of plastic to the cardboard (see picture 1) before assembling to add strength, and then glue together the box as shown in pictures two and three. Attach the tripod into the hole then glue another holed piece on the other side.
In order to make the bipod lock into different positions, we are going to use neodymium magnets. See pictures four and five above to see how to configure the locking system. Glue triangular extrusions to the side of the mount box, and embed magnets in them that will line up with magnets embedded in the bipod legs.
Step 22: Configure the Magazine to Load Ammo
When complete, the gun will be capable of firing pen springs. In order to load the pen springs into the barrel of the gun, we are going to use magnets.
- Take a pen tube and cut off part of the top half as shown in pictures one and two.
- Take a straw and cut out a slot as shown in picture three.
- Use picture four as a guide to position the pen tube and straw onto the barrel of the gun. the pen tube goes on top, with the straw tube inserted inside it. Both openings are facing down to allow the magazine to load a pen spring.
- On the top of the magazine, glue a piece of cardboard with a magnet embedded inside it. Experiment with the height to allow a pen spring to fit neatly into the barrel when the magazine is inserted. Picture six shows a pen spring locked in place on the magazine via magnets.
Step 23: Build a Covering Over the Shooting System
We are now going to build a covering to go over the shooting system. This process is made slightly tricky because it needs to be removable in order to access the inner workings of the gun, but even so it is not too difficult.
- Start off by cutting a piece of cardboard as shown in picture one that will be able to cover the entire shooting mechanism, as shown in picture two.
- Once cut, glue it together as shown in picture three.
- Make sure the covering fits like in picture four.
- Lastly, build a rail on top like shown in picture five. Atop this rail is where the scope will be mounted.
Step 24: Make the Scope
In order to make the scope extra realistic, I used a real rifle scope that I covered in a shell of cardboard. This gives it the cardboard appearance with the optics of a real sniper rifle. If you don't have a rifle scope, though, don't worry about it. You can still make it fine by following these instructions and just leaving out the real scope.
- Build a "covering frame" over the scope to lock it in place and attach it to the top of the rail on the gun. My rifle scope had screws on the bottom that could be tightened into stuff, so I screwed them into a few layers of cardboard for added support.
- Once the scope is attached, start gluing some cardboard tubes to it. You may need to adjust the sizes, which can be done by cutting a strip out of a tube and then rolling it tighter, then securing with glue.
- If you need to taper the scope somewhere, use the following link to create a truncated cone template that will help you cut the right size piece of cardboard:
http://www.templatemaker.nl/index.php?template=con...
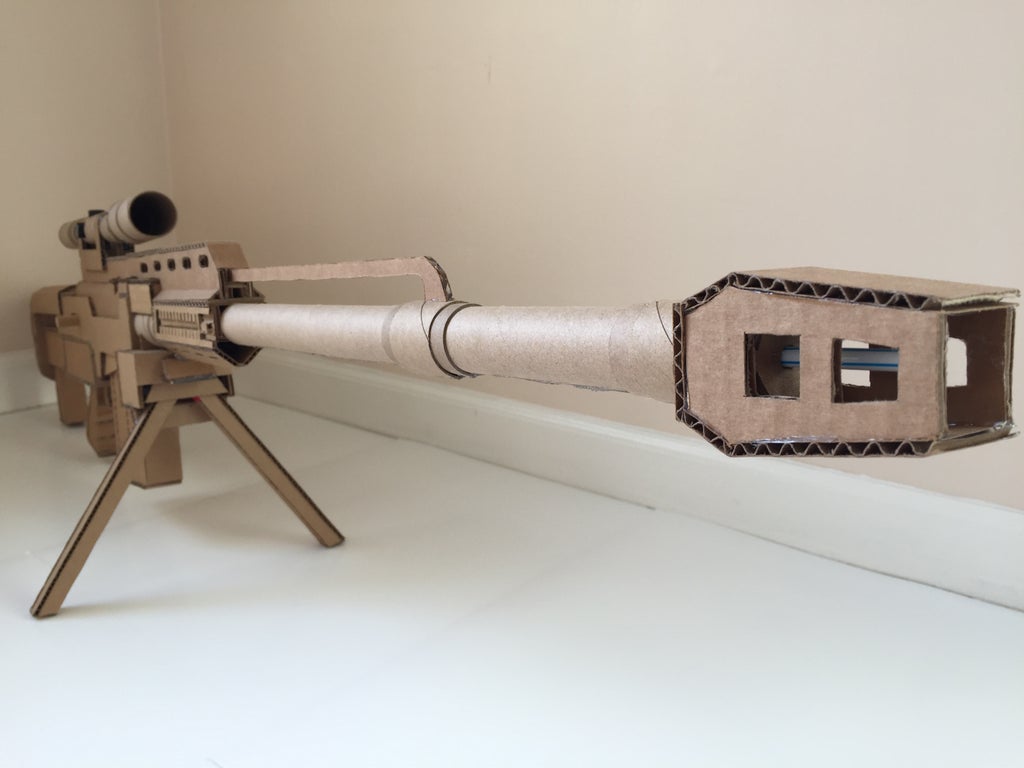
Step 25: Make the Barrel
To make the barrel:
- Extend the barrel using straws by gluing them end to end. Keep extending as you make more and more of the barrel (see pictures one and two).
- Start off by gluing a cardboard tube onto the end of the gun. Cut off half the tube lengthwise to make it shorter if needed (see pictures one and three).
- Glue pieces of cardboard on top of the end of the gun (see picture three).
- On top of those, glue some more cardboard to extend the rail previously built on the removable cover. Add accents as you wish, using the same method used to make the magazine (see pictures four and five).
- Extend the barrel by gluing on more cardboard tubes. Cut a long strip of cardboard to create a support piece that can be glued connecting the barrel of the gun with the main body below the rail (see picture six).
- Once the gun is at its full length, complete the project by creating a spoiler piece that will be glued to the very end of the barrel.
Step 26: Finished!
You're finished! Awesome. Above are some pictures of the completed project.
Be the First to Share
Recommendations
Source: https://www.instructables.com/Fully-Functioning-Cardboard-AS-50-Sniper-Rifle/
0 Response to "How to Make a Cardboard Sniper Rifle That Shoots Easy"
ارسال یک نظر